Configure Microsoft Outlook
To start using Microsoft Outlook to send and receive email, you have to set up an account. Microsoft outlook allows you to configure multiple email accounts.This article will help you to configure Microsoft Outlook 2007 but the instructions can be used for earlier versions also.. I will explain you how to setup microsoft outlook to send and receive emails. You can download the emails from your email server to your desktop using the microsoft outlook software. This will help you to read your emails offline even when you are not connected to the internet. You can also draft your emails offline at your convinience and then send them when you are connected to the internet.
This page will cover following points:
1. Start Microsoft Outlook
2. Set up a Microsoft Outlook Email Account
Following are the steps to configure Microsoft Outlook 2007:
- In Microsoft Outlook 2007, from the Tools menu, select Account Settings.

- On the E-mail tab, click New. This will bring up Microsoft Outlook's new account setup wizard.

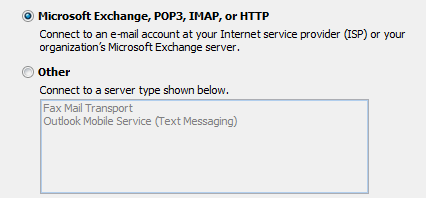
- Select Microsoft Exchange, POP3, IMAP, or HTTP and click Next.
This tutorial will show you how to configure the POP3 account. IMAP and HTTP
needs a different configuration.

- Check Manually configure server settings or additional server types and click Next.

- Select Internet E-mail and click Next.

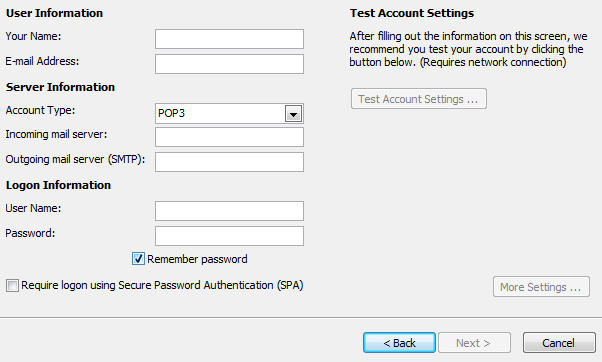
- Enter the requested information: You will get these information from your email
service provider.

- Your Name: your name
- Email Address: the email address the messages will be sent from
- Account Type: POP3
- Incoming Mail server: pop.yourdomainname.com
- Outgoing Mail server: smtp.yourdomainname.com (It is also called SMTP i.e. Simple Mail Transfer Protocol)
- User Name: the full email address including the domain name i.e. admin@samplewebsite.com
- Password: the password for the email address
- Click More Settings.
- On the Outgoing Server tab, check My outgoing server (SMTP) requires authentication.

- Select Use same settings as my incoming mail server and click OK.
If your service provider needs you to authenticate through other account
details. Please Select Log on Using and enter the login details in the
User Name and Password text boxes.
- Click Test Account Settings to verify everything is configured correctly.
- Click Next and then click Finish.